This walk-through-tutorial (yet another) is to guide you through the usage of the MobX library, while building a React application.
The application we'll build is a simple Todo App.
The post discusses the following topics:
- What is MobX - A very short explanation about what MobX is.
- Why do you need it? - Reasons to consider using MobX.
- Why not Redux (another state management library)?
- Code tutorial - Part 1 (out of 2)
What is MobX - https://mobx.js.org/
In short - MobX is a state management library.
In "long" - MobX is a JS library that allows you to define "observable" state (/model/your JS Objects) containing your App information.
The library gives you the power to derive any computed model that depends on observables automatically!
As MobX puts it:
Anything that can be derived from the application state, should be derived. AutomaticallyIn aspect to React:
This gives you the power to mutate the state directly by reference from your components without calling React's setState, and triggering render only on the components that need to be re-rendered.
Pretty nifty.
For more about MobX: https://mobx.js.org/
Why do you need it?
First of all, no one said you should use it. There are plenty React based applications that work just fine without MobX.
However, you should consider MobX for the following reasons, that may give you some advantage.
For instance:
However, you should consider MobX for the following reasons, that may give you some advantage.
For instance:
- Simpler Components - Having a shared state in your App between several components can be cumbersome to share, especially if one component is deeply nested in another component that uses same data.
It would mean, that you'd need to pass to all the children of the top-most component that state, resulting many components that are on the way passing on that same state, but never using it.
Components that change state to other components, the state of your application distributed among many components, and other complications.
With MobX, you can specify for each component the exact props it should use. - Organized state model - Your application state with MobX is mostly organized in one or few objects that hold only the state of your application. That makes it easy to reason about the application's model.
- Optimized App - render only components that need to render instead of
That sounds like I'm trying to "sell" you MobX.
I find it to be a good library for state management (not saying it's the only, check Redux too), despite the "magic" which I dislike in principal in software, and the awkward feeling I get when this reminds me of "two-way-data-binding" stuff (which the industry has a love-hate relationship since the ages of JavaFX, Flex, and probably even earlier libraries and frameworks).
It comes with a small cost of adding a library to your App, and learning how to use it.
If you have a small application, with a very simple model, you might not even need it.
"A predictable state container for JavaScript apps."
In other words - it's a state managing library, like MobX is. But different.
The "what" is similar, the "how", a bit different.
So first of all - why not use it instead?
There's really no good answer for that, and IMO it's a matter of personal style and what you're comfortable with. It does seem to have less "magic" though.
(The "magic" i refer to are the observables in MobX - this is where the MobX fun happens).
Some say that MobX is easier to get started with as there's less code to write.
It supports several (optional) “stores” vs one store in Redux which can be annoying if you already have an existing App and you need to start consolidating all your state to a single place.
It conforms to a non-FP paradigm, where your state can be mutable (the observable objects in your state).
In any case, I would advise to try Redux before you make your decision.
Lets get our hands dirty.
We're going to build the Todo App using MobX & React at last.
Step 0: Fork or clone the Git Repo
Go here and fork/clone it: https://github.com/nirgit/todoMobxTutorial
You will now have a skeleton application which is ready and set up, using ES6 with JSX & Webpack.
MobX is also included in the package.json, so you won't need to add it as a dependency.
Go to the project's directory and run from the console / shell:
Now go to http://localhost:8080
Your web page should look like this:
Re-open http://localhost:8080, you should now see this:
You can open the app.js file and see all the code pretty much.
You won't find anything unusual.
Note how the entire state though is stored on the App component, so once we will refactor the code a little bit, we will have to pass in the todos as a prop to the child components, and probably stuff like a callback to toggle the todos "isDone" field, so we can use setState in order to make it work.
Go back to your shell and now, checkout the step1_2 branch.
Open the App.js file and take a look at the render method.
See the line?
...
<TodoList todos={this.state.todos} toggleDone={this.toggleDone.bind(this)} />
...
Notice how we pass in to the TodoList component the toggleDone callback, which is still defined on the App component. If you would decide to create Todo components, you'd probably pass on that callback into each of those components.
And so you will have a component which passes a function to a child (TodoList) which does nothing with that function but pass it on to its children, which affect a state that's found on its grand parent.
A bit Messy.
If you'd have this situation in a large scale application, not only it may be confusing, but it could be practically impossible to reason about the full state of your application at any given point in time.
Lets add MobX and see what happens.
@observable
The API's most significant and basis to all the MobX "magic" is the observable function / decoration (function if you decide not to use the decoration syntax from ES Next).
On this post we'll stick with the decoration as it feels (subjective) a cleaner way to declaratively state the fact a piece of data/object is being observed.
@observer
We have an "observable" data, now what?
We need someone to "observe" it, and react to the changes.
MobX being a library in its own right, does not provide an @observer for React Components "OOTB" ("out of the box").
In order to use such @observer we need to use the MobX-React NPM package.
Then we can "decorate" our React Components with an @observer decoration.
The reaction to the changes made to the observable object will result in calling the render method of the React component observing that object. Pretty cool.
Code example:
So every time you will change the bestMovies collection, the render of MovieList component will be triggered.
Stop your app from running if it is, go back to your shell and now, checkout the step2 branch.
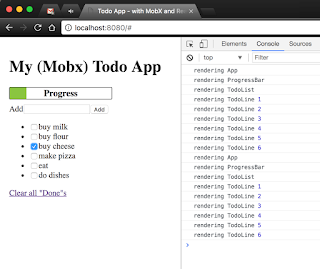
You shouldn't see any visual difference, but open the browser's Console and see what you got:
You can run the quick following check.
Go to the todoLine.js file and change the following line:
export default observer(TodoLine);
to this line:
export default TodoLine;
See how we omitted the MobX observer?
Now go back to the browser, and try to check the same checkbox as earlier.
Keep your console opened. You should get the following prints:

I find it to be a good library for state management (not saying it's the only, check Redux too), despite the "magic" which I dislike in principal in software, and the awkward feeling I get when this reminds me of "two-way-data-binding" stuff (which the industry has a love-hate relationship since the ages of JavaFX, Flex, and probably even earlier libraries and frameworks).
It comes with a small cost of adding a library to your App, and learning how to use it.
If you have a small application, with a very simple model, you might not even need it.
Why not Redux?
In case you don't know Redux, as mentioned on their site is:"A predictable state container for JavaScript apps."
In other words - it's a state managing library, like MobX is. But different.
The "what" is similar, the "how", a bit different.
So first of all - why not use it instead?
There's really no good answer for that, and IMO it's a matter of personal style and what you're comfortable with. It does seem to have less "magic" though.
(The "magic" i refer to are the observables in MobX - this is where the MobX fun happens).
Some say that MobX is easier to get started with as there's less code to write.
It supports several (optional) “stores” vs one store in Redux which can be annoying if you already have an existing App and you need to start consolidating all your state to a single place.
It conforms to a non-FP paradigm, where your state can be mutable (the observable objects in your state).
In any case, I would advise to try Redux before you make your decision.
Code walk-through
Lets get our hands dirty.
We're going to build the Todo App using MobX & React at last.
Step 0: Fork or clone the Git Repo
Go here and fork/clone it: https://github.com/nirgit/todoMobxTutorial
You will now have a skeleton application which is ready and set up, using ES6 with JSX & Webpack.
MobX is also included in the package.json, so you won't need to add it as a dependency.
Go to the project's directory and run from the console / shell:
> npm run start
Now go to http://localhost:8080
Your web page should look like this:
Step 1: Creating a plain React Todo App
Lets create our plain Todo application based on React only.- Stop Webpack watching your changes
- Go to the project's directory and run from the console / shell:
> git checkout step1
> npm install
> npm run start
> npm install
> npm run start
Great!
You now have a functional React Todo app.You can open the app.js file and see all the code pretty much.
You won't find anything unusual.
Note how the entire state though is stored on the App component, so once we will refactor the code a little bit, we will have to pass in the todos as a prop to the child components, and probably stuff like a callback to toggle the todos "isDone" field, so we can use setState in order to make it work.
Go back to your shell and now, checkout the step1_2 branch.
> git checkout step1_2
Open the App.js file and take a look at the render method.
See the line?
...
<TodoList todos={this.state.todos} toggleDone={this.toggleDone.bind(this)} />
...
Notice how we pass in to the TodoList component the toggleDone callback, which is still defined on the App component. If you would decide to create Todo components, you'd probably pass on that callback into each of those components.
And so you will have a component which passes a function to a child (TodoList) which does nothing with that function but pass it on to its children, which affect a state that's found on its grand parent.
A bit Messy.
If you'd have this situation in a large scale application, not only it may be confusing, but it could be practically impossible to reason about the full state of your application at any given point in time.
Lets add MobX and see what happens.
Step 2: Adding MobX to our React App
MobX uses a very small set of core API.@observable
The API's most significant and basis to all the MobX "magic" is the observable function / decoration (function if you decide not to use the decoration syntax from ES Next).
On this post we'll stick with the decoration as it feels (subjective) a cleaner way to declaratively state the fact a piece of data/object is being observed.
@observer
We have an "observable" data, now what?
We need someone to "observe" it, and react to the changes.
MobX being a library in its own right, does not provide an @observer for React Components "OOTB" ("out of the box").
In order to use such @observer we need to use the MobX-React NPM package.
Then we can "decorate" our React Components with an @observer decoration.
The reaction to the changes made to the observable object will result in calling the render method of the React component observing that object. Pretty cool.
Code example:
So every time you will change the bestMovies collection, the render of MovieList component will be triggered.
Stop your app from running if it is, go back to your shell and now, checkout the step2 branch.
> git checkout step2
and run the following to install missing missing NPM pacakges and re-run the app:
> npm install && npm run start
You shouldn't see any visual difference, but open the browser's Console and see what you got:
See how now you get a log print in the console when a component renders.
Try clicking a checkbox, you should get the following prints:
See how now you get only part of the prints?
Lets do a quick analysis:- App Component - renders because its render function is using the isDone flags of the Todos in order to render the Progress Bar.
- ProgressBar Component - renders for obvious reasons.
- TodoList Component - renders because it passes all of the properties of the Todo objects, including the isDone property when rendering.
It does that by using the ES6 spread operator (see in the code "{...t}") - The TodoLine Component - A new component created representing the Todo lines, as it makes it clearer to see MobX's benefit.
Notice how only the TodoLine Component whose line we changed rendered.
All the rest - stayed the same without getting re-rendered.
You can run the quick following check.
Go to the todoLine.js file and change the following line:
export default observer(TodoLine);
to this line:
export default TodoLine;
See how we omitted the MobX observer?
Now go back to the browser, and try to check the same checkbox as earlier.
Keep your console opened. You should get the following prints:

Hopefully you got something out of this post, as it should give you an idea of what MobX is by now. Stay tuned for Part 2 blog post that will discuss topics like:
- Adding Actions and Action Handler
- Adding a Provider component
- Adding Containers
Or go explore more yourself on https://mobx.js.org/.
Enjoy,


