Pages

Showing posts with label GWT. Show all posts

Friday, March 8, 2013

GWT Chrome extension with JSONP Server communication

I thought this post would be a good idea for people who want to know how to make an 'end-to-end'
GWT Chrome extensions, with a connection to a server of their own.

While this demonstrates specifically how to enable to communication from a Chrome extension, there is
no difference in code if you wish to deploy your client code else where (not on Chrome).
Many web applications choose to deploy their Server code & Client code on the same application server, like JBoss or Tomcat.

As you know in GWT there are several ways to communicate with a server.
One of them is RPC for instance, which gives you the ability to invoke methods on a Java interface,
not having to deal with anything but Java code. Which is cool, as it makes a very smooth transition from
the client side code to the server side code.

However, when we want to implement this in a Chrome extension things get a bit trickier.
The reason is that you'd have to separate your server module from your Chrome extension module
(as we can't deploy Server side classes to Chrome - it runs only JavaScript),
and would need a shared model between the two in order to communicate.
It's not hard to do at all, it's only a longer example to make.
(In Eclipse, if you create a new "Web Application Project" using Google's plugin, you will have the client & server code in the same project, with a "shared" directory which serves a model bridge between the two).

Another option that exists, is using JSONP communication to the server.
In our case - this makes it a lot simpler.
We will expose some REST API on a Server we'll implement, for getting images, and send a JSONP request from the QuickPik extension to retrieve those images. Obviously, it can be anything else you want it to be in your application.

TO THE CODE!!!

The Server

In order to create a REST service and expose it, we will use the Jersey library which is an implementation for
building RESTful web services. It's very simple.

The following QuickpikService class, is our REST service:


package quickpik.server.web;

import java.io.IOException;
import java.io.InputStream;
import java.net.MalformedURLException;
import java.net.URL;
import java.util.Date;

import javax.ws.rs.GET;
import javax.ws.rs.Path;
import javax.ws.rs.Produces;
import javax.ws.rs.QueryParam;
import javax.ws.rs.core.MediaType;

import org.codehaus.jettison.json.JSONException;
import org.codehaus.jettison.json.JSONObject;

import com.sun.jersey.api.json.JSONWithPadding;

@Path("/quickpik")
public class QuickPikService {

private final static int BUFFER_SIZE_IN_BYTES = 1024;
private final static String FLICKR_API = "http://api.flickr.com/services/feeds/photos_public.gne?format=json&tagmode=all&tags=" ;

@GET
@Path("searchPhotos")
@Produces({ "application/x-javascript", MediaType.APPLICATION_JSON})
public JSONWithPadding getPhotos(@QueryParam("searchExp") String searchExp,
@QueryParam("callback") String callback) {
// "log" the call
System.out.println("[" + new Date() + "] searching for: " + searchExp) ;
URL flickrUrl = getSearchURL(searchExp) ;
JSONObject data = tryToGetSearchResult(flickrUrl);
return new JSONWithPadding(data, callback);
}

private URL getSearchURL(String searchExp) {
String composedURL = FLICKR_API + searchExp;
try {
return new URL(composedURL);
} catch (MalformedURLException e) {
e.printStackTrace();
throw new RuntimeException("URL composition failed. Please check your URL: " + composedURL, e) ;
}
}

private JSONObject tryToGetSearchResult(URL flickrUrl) {
try {
return getSearchResult(flickrUrl) ;
} catch (IOException | JSONException e) {
e.printStackTrace();
throw new RuntimeException("Failed searching.", e) ;
}
}

private JSONObject getSearchResult(URL flickrUrl) throws IOException, JSONException {
InputStream is = flickrUrl.openStream() ;
String result = readDataFromStream(is);
// Flickr specific string prefix for the JSON feed.
if(result.indexOf("jsonFlickrFeed(") >= 0) {
result = result.substring("jsonFlickrFeed(".length(), result.length()-1) ;
return new JSONObject(result) ;
} else {
return new JSONObject("{}") ;
}
}

private String readDataFromStream(InputStream is) throws IOException {
StringBuilder data = new StringBuilder() ;
byte[] buffer = new byte[BUFFER_SIZE_IN_BYTES] ;
int bytesRead = is.read(buffer) ;
while(bytesRead != -1) {
data.append(new String(buffer, 0, bytesRead)) ;
bytesRead = is.read(buffer) ;
}
is.close() ;
return data.toString() ;
}
}


That's it. This our REST service, and we are exposing our API by using the @Path annotations
on the class and on the public method getPhotos. There are also other annotations such as the
@GET annotation and the @Produces annotation which state that the method is invoked on
an HTTP GET, and returns (@Produces annotation) a JSON (with Padding eventually = JSONP) object.

As you can see, in the class, we are using a Flickr API to get our images data from.

Now all that's left in order to make this service work, is to define the Jersey servlet in the web.xml file,
which is done this way:


<web-app>
...

        <servlet>
    <servlet-name>Jersey REST Service</servlet-name>
    <servlet-class>com.sun.jersey.spi.container.servlet.ServletContainer</servlet-class>
    <init-param>
      <param-name>com.sun.jersey.config.property.packages</param-name>
      <param-value>quickpik.server.web</param-value>
    </init-param>
</servlet>

<servlet-mapping>
    <servlet-name>Jersey REST Service</servlet-name>
    <url-pattern>/rest/*</url-pattern>
</servlet-mapping>

...
</web-app>


After doing that, we're able to refer to our REST service by using a URL in the browser:
http://localhost:8080/<web-app-name>/rest/quickpik/searchPhotos?searchExp=<our-search-term>

In order to verify this worked indeed and to get a better understanding of how the strucutre of our JSON result looks like, before even writing code to the GWT Chrome extension client,
i did a small test using jQuery, to see whether this worked. - You can find it in the GitHub repository.
What I did in a nutshell, was to call the REST API:
$.getJSON('http://localhost:8080/qpserver/rest/quickpik/searchPhotos?searchExp=hello&callback=?', jsonCB);

So I executed an AJAX call to search for "hello", and passed a callback - jsonCB to process the result.
jsonCB looks like this:


function jsonCB(result) {
console.log(result);
if (result !== null && result) {
if (result.items.length === 0) {
$($("#serverResponses")[0]).append("No results.")
} else {
for (item in result.items) {
var url = result.items[item].media.m;
var imgItem = document.createElement('img');
imgItem.src = url;
$($("#serverResponses")[0]).append("Server response: ")
.append(url).append("<br>");
$($("#serverResponses")[0]).append(imgItem).append("<br>");
}
}
}
}


Note the highlighted text! - This is how we get the URL information of the photo items being sent back to us from the server.
So now we know that inside "result" which is a JSON object, resides an array of objects, that contain each
an object called media with a field called m.
You can discover this by simply debugging the returned values from the Server in the browser.

So now, we can finally add some code to our GWT Client.


Client side - GWT Chrome extension

In the previous posts of QuickPik, you might have noticed, that in order to add an additional ImageDataSource, all you need is to implement an Interface IImagesDataSource and add that ImageDataSource to the DataSource enum.
It's much easier than it sounds.
So we need to do the following:
1. Write an ImageDataSource that "talks" to our Server.
2. Edit the manifest.json file to allow communication to our server in order to comply with the
    "Content Security Policy" of Chrome's extensions.


IImageDataSource implementation - ServerDS


public class ServerDS implements IImagesDataSource {

private final static String QUICKPIK_SERVER_URL = 
"http://localhost:8080/qpserver/rest/quickpik/searchPhotos?searchExp=" ;

          ...

@Override
public void getImages(final String searchExpression, final FilterLevel filter, 
                                                 final Callback<PhotosSearchResult, Void> callback) {
String url = QUICKPIK_SERVER_URL + searchExpression ;
JsonpRequestBuilder jsonp = new JsonpRequestBuilder();
jsonp.requestObject(url, new AsyncCallback<ServerResult>() {
public void onFailure(Throwable throwable) {
// do some error handling..
}

public void onSuccess(ServerResult result) {
handleLoadedImagesResult(searchExpression, filter, result, callback) ;
}
});
}

private void handleLoadedImagesResult(String searchExpression, FilterLevel filter, ServerResult result, 
Callback<PhotosSearchResult, Void> callback) {
JsArray<ServerImageItem> imageItems = result.getItems();
LinkedList<Photo> photos = collectImages(imageItems);
callback.onSuccess(new PhotosSearchResult(searchExpression, filter, photos, 0, false)) ;
}

private LinkedList<Photo> collectImages(JsArray<ServerImageItem> imageItems) {
LinkedList<Photo> photos = new LinkedList<Photo>();
for (int i = 0; i < imageItems.length(); i++) {
ServerImageItem imageItem = imageItems.get(i);
Photo p = new Photo(i+"", imageItem.getImageURL(), imageItem.getImageURL()) ;
photos.add(p) ;
}
return photos;
}
}


I'll try to explain the code very shortly:
1. At the top of the class you can locate the URL to the server we will be using to get the images from.
2. getImages method which must be implemented is passed a searchExpression a filter and
   a callback. We will ignore the filter to make things simpler.
   GWT offers a class called JsonpRequestBuilder which allows us to invoke an asynchrounous
   call to the server, and passing a callback to deal with the result of the invocation.
3. If the call was successful, we have to handle the result somehow. We do that by calling a handle method.
4. In the handleLoadedImagesResult method, we got an object called ServerResult. 
    ServerResult is a custom object created especially for this operation. It is a wrapper to
    a JavaScriptObject, that gives access to the result.items object array. (Remember from the jQuery test?)

This is how ServerResult looks like:


public class ServerResult extends JavaScriptObject {

   protected ServerResult() {
   }

   public final native JsArray<ServerImageItem> getItems() /*-{
     return this.items ;
   }-*/;
}


The native getItems method, is a convention of GWT to write JavaScript code to the underlying JavaScriptObject that the Java object wraps. So when you invoke getItems, behind the scenes the
JavaScript code "return this.items" is executed, returning the JavaScript items Array.

I also mapped the objects in this array to a Java object in the same way I did with ServerResult.
Following the same idea, ServerImageItem looks like this:


public class ServerImageItem extends JavaScriptObject {

protected ServerImageItem() {
}

public final native String getImageURL() /*-{
    return this.media.m ;
  }-*/;
}


Here we use getImageURL method to return the (JavaScript) object's media.m property.
(This is exactly the same structure that was referred to when testing with jQuery above).


So after this long explanation, all we do in the "handle" method, is basically gathering all of our
images URLs, creating a Photo list, like expected in the callback passed to us in the getImages method
invocation and invoking the callback, passing it an expected PhotoSearchResult object containing
our Photos.

5. Now we must add our ServerDS to the DataSource enum, so it will be included as a data source
    when we run a search.
    We do that simply by adding the (bolded) line below:

public enum DataSource {

// add here your data sources
FLICKR(false, new FlickrDS()),
QUICKPIK_SERVER(true, new ServerDS())
;
         ....
}

Notice how I intentionally turned off FLICKR Data Source, setting its isEnabled flag to false.

6. Last thing that needs to be done, is to enable our Chrome extension to make calls to our server by
    editing the manifest.json file, adding the following line to it:

{
   ....
   // A relaxed policy definition which allows script resources to be loaded from localhost:8080 over HTTP
  "content_security_policy": "script-src 'self' http://localhost:8080; object-src 'self'"
}


That's all folks, all you need to do now, is build the Server (I did it with Gradle in this project), compile
your GWT client, deploy it on Chrome and watch it work.

You can access all the code on GitHub, and download it.

Code on GitHub
All of the project's code can be found on GitHub at: https://github.com/nirgit/Quickpik-with-server


Wednesday, December 5, 2012

SpacePong - version 2 - HTML5 Game with GWT

Hey,
This is just a small update of the game, to make it a bit more fun to play actually.
So now you can pick different levels to play and have something a bit more challenging.

The source code has changed of course, and you can find it like before on GitHub:
https://github.com/nirgit/GwtPong/tree/space_pong_ver_2_0_0


Enjoy!

Wednesday, November 28, 2012

GWT HTML5 Game Example - Pong

Hi everyone,

This post is intended to present a very simple example of a game, made with the HTML5 support of GWT.
The game uses only GWT, without any other 3rd party libraries such as PlayN which works with GWT and is rather famous and meant for creating games based on HTML5.
Take a look at PlayN's website: http://code.google.com/p/playn/

GWT provides an API to the underlying HTML5 Canvas, and lets you use it to create
custom graphics.

This example shows the game of Pong. Though the game might be a little buggy, it nevertheless makes use of the fundamental HTML5 Canvas features, such as drawing simple geometric shapes, such as rectangles, circles, gradients and with those elements creating a very simple and compact code for a game.

You can find all the code on GitHub for you to clone: https://github.com/nirgit/GwtPong

Click the screenshot to play:


Have fun playing!

Sunday, August 26, 2012

GWT Chrome extension using version 2 manifest

Hi everyone,

A while ago I wrote a small post about how to create Chrome extension using GWT, claiming
you could use GWT to make powerful Chrome extension.
One of the comments was regarding the usage of the manifest version.
When you write a Chrome extension, you must provide with a file called manifest.json which
serves as some kind of descriptor file to your extension.
It contains all sorts of things, such as the name of the extension, description, icon, action,
javascript files involved, and so on...

One of the entries in that file is the version entry.
As for today Chrome supports the current version - 2, and also supports (for the moment)
version 1.
However, this is changing, and Google already announced that they will stop supporting version 1
in the future (see http://developer.chrome.com/extensions/manifest.html#manifest_version), due
to security reasons.

So I was asked whether it was possible or how is it possible to deploy the GWT extension with the
version 2 attribute in the manifest.json file.

Version 2, is stricter in terms of security than version 1. Especially when it comes to using external JavaScript files.
You can read about security concerns over here:
http://developer.chrome.com/extensions/content_scripts.html#security-considerations
http://developer.chrome.com/extensions/xhr.html

One of the problems I faced, was the inline scripting I had (JavaScript showing inside the HTML).
That problem came not only on my "Hosting" HTML file, but also on the compiled outputs of GWT,
where HTML file which was needed was created and contained JavaScript code.
When that happened, I couldn't execute the extension on Chrome using version 2 in the manifest.json file.

I wrote in response to a comment someone left regarding this problem, that in case Google would have a way to separate JavaScript files from HTML, then problems would be solved.
Back then, I didn't see such options for the GWT compiler.

However, after doing some more searching, I found out that it does exist (!).
And so by adding a simple line in the .gwt.xml file of the application, you can compile all
your GWT application output into a single JavaScript file. Meaning - no HTML files containing
inline JavaScripts.

The line one needs to add is:
...
<add-linker name="sso" />
...

I added it to my Quickpik.gwt.xml file, and so when you run the GWT compiler, you get at the end
one JavaScript file containing the entire code of your app. Awesome!

You can access the entire code on Github and download it from there:
https://github.com/nirgit/Quickpik

You can simply click on the "Downloads" on the right hand of the screen, in order to download
the repository as a ZIP file.

In case you're a GIT user, my suggestion is that you just clone the repository. It's really small.
Simply open your GIT shell and type:
git clone https://github.com/nirgit/Quickpik.git

The extension is already ready to be used in Chrome, and you can deploy it by opening Chrome's
Tools -> Extensions tab, and checking the "Developer mode" box.
Afterwards, you will be able to deploy the extension by selecting the "Load unpacked extension..."
option and selecting the war directory of Quickpik.

I am hoping this is somewhat useful.
I think GWT is an absolutely great tool, and one that can be a lot of fun writing Chrome Extensions.

Until next time!


Wednesday, July 11, 2012

Source on a Github repository

Hey everyone,

This is a really short note.
From now on, in case I will publish more code in the future I will try to make sure it is uploaded 
to Github, so anyone could profit from it.

The Github repository URL: https://github.com/nirgit

Enjoy.

Monday, July 9, 2012

Quickpik - GWT Chrome extension - Search photos


As a continuation to my previous post, this isn't about discussing anything.
It is about doing - giving an example of something quite simple & cool which you could do yourself using GWT, to build a chrome extension.

Being a bit of a GWT enthusiast, I built an extension for Google Chrome called QuickPik - which allows users to search for images from right from the toolbar.

Quickpik is using Google Images & Flickr (Yahoo) APIs.
You can run a simple search, and get some images as results. It's really simple.

You can just download the zip file from the link below, extract it and install the .crx file right into Google Chrome by dragging the file into it. If you're scared of some evil code running on your browser - just open the source code in the zip file, build the extension yourself, and then install it.

Keep in mind that the idea of this post is to show how easy it is to create a
cool extension for Chrome.
The code might not be extremely well documented, nor does it strictly follow Google's best practices like the MVP pattern or bundling CSS or Image resources and so on, but...

You can expect something compact and simple enough once you open it and take a look.
I don't think there should be a problem understanding much of the code.

Would love to get feedback if this helped anyone.

Both source code & Chrome extension below are available to download in one zip file.

Have fun !!!

The project on Github:  https://github.com/nirgit/Quickpik
A Zip file to download:   http://www18.zippyshare.com/v/16094412/file.html


Tuesday, June 5, 2012

Building Chrome extensions with GWT


Recently i took a look into Google Chrome Web Store. 
The web store as you can take a look for yourself, is loaded with apps, which many of them are given free.


I decided to understand what it takes from a simple developer like myself to build such an app which I can run on my browser & distribute on the Chrome Web Store.


Surprisingly, it does not take a lot of effort to write such an app/extension, especially if you're already familiar with a little bit of web development.
Google Chrome Extensions: http://code.google.com/chrome/extensions/overview.html


So what you really need is some knowledge of JavaScript, HTML & CSS to make a neat extension.


For me the real story began when I realized that for such requirements, one could actually use the (amazing) GWT framework to write such an extension. 
If you never looked into GWT, my personal recommendation is that you absolutely must in case you're into web-development. GWT is a truly incredible tool from my experience.


If you look at the file structure of such an extension, you can see from the "Google Chrome Extensions - Getting Started" tutorial (http://code.google.com/chrome/extensions/getstarted.html) that we're talking about 4 important files:

  1. manifest.json - This file if you like is some kind of a descriptor of your extension.
  2. An HTML file "hosting" your extension. 
  3. A JavaScript file containing all the cool interaction with your extension, and your script.
  4. A CSS file - for styling.

When you write your GWT application in Java and compile it afterwards, you get such files, except for the first one. That you will have to add yourself to the project.


So enough of "blabing" - Lets dive right into "How to do it" (if you're impatient, just scroll to the bottom of the page to download a zip file of the project):


1. Start a new web-application project in Eclipse, and let it create the default skeleton of the project.


2. After the project has been created, make some clean up in the project's structure by deleting the "server" and the "shared" packages.


3. Edit the .gwt.xml file and make sure the file's contents is something like:
<?xml version="1.0" encoding="UTF-8"?>
<module rename-to='mychromeext'>

  <!-- Inherit the core Web Toolkit stuff.                        -->
  <inherits name='com.google.gwt.user.User'/>
  <!-- Inherit the default GWT style sheet.  You can change       -->
  <!-- the theme of your GWT application by uncommenting          -->
  <!-- any one of the following lines.                            -->
  <inherits name='com.google.gwt.user.theme.clean.Clean'/>
  <!-- <inherits name='com.google.gwt.user.theme.standard.Standard'/> -->
  <!-- <inherits name='com.google.gwt.user.theme.chrome.Chrome'/> -->
  <!-- <inherits name='com.google.gwt.user.theme.dark.Dark'/>     -->
  <!-- Other module inherits                                      -->
  <!-- Specify the app entry point class.                         -->
  <entry-point class='com.techdrum.chrome.ext.example.app.client.MyChromeExt'/>
  <!-- Specify the paths for translatable code                    -->
  <source path='client'/>

  <set-property name="user.agent" value="safari"/>
</module>
4. Delete the auto-generated Async file and it's matching service file.

5. Write some GWT code in the MyChromeExt.java file, something very simple like - 

package com.techdrum.chrome.ext.example.app.client;

import com.google.gwt.core.client.EntryPoint;
import com.google.gwt.user.client.ui.Button;
import com.google.gwt.user.client.ui.RootPanel;
import com.google.gwt.user.client.ui.TextBox;

/**
 * Entry point classes define <code>onModuleLoad()</code>.
 */
public class MyChromeExt implements EntryPoint {
/**
* This is the entry point method.
*/
public void onModuleLoad() {
final Button sendButton = new Button("Send");
final TextBox nameField = new TextBox();
// We can add style names to widgets
sendButton.addStyleName("sendButton");
// Add the nameField and sendButton to the RootPanel
// Use RootPanel.get() to get the entire body element
RootPanel.get("nameFieldContainer").add(nameField);
RootPanel.get("sendButtonContainer").add(sendButton);
// Focus the cursor on the name field when the app loads
nameField.setFocus(true);
nameField.selectAll();
}
}
6. Almost done! Create a new file called "manifest.json" and place it under the "war" directory.
The file should contain the following:

{
  "name": "My GWT ext",
  "version": "1.0",
  "description": "Simple GWT Extension!",
  "browser_action": {
    "default_popup": "MyChromeExt.html"
  },
  "permissions": [
  ],
   "web_accessible_resources": [
    "mychromeext /E949D2D1E7CE643145D4D3D5FC28BB31.cache.html"
  ]
}
*Note the stressed file name!

7. Compile the project.

8. Match the file name with the .cache.html suffix under the directory mychromeext to the one mentioned in paragraph 6. 
So if you have something like BF13DA7B8EE69ECA8CAA8F35290E1E1E.cache.html
then your new manifest.json should look like:

{
  "name": "My GWT ext",
  "version": "1.0",
  "description": "Simple GWT Extension!",
  "browser_action": {
    "default_popup": "MyChromeExt.html"
  },
  "permissions": [
  ],
   "web_accessible_resources": [
    "mychromeext/BF13DA7B8EE69ECA8CAA8F35290E1E1E.cache.html"
  ]
}

9. That's it! Now you're ready to deploy your new extension on Google Chrome.
    To do that - open Chrome, and open the Extensions window:


10. Make sure to check the "Developer Mode" box, and then click on "Load unpacked extension..."
Select the war directory of the compiled project, and your new extension should appear on the Chrome toolbar next to the address bar.
When clicking on it, you'll see your app:


Congratulations!


Get the full code of the project here.

Monday, May 7, 2012

GWT - FlowPanel + CSS vs HorizontalPanel and VerticalPanel

I've been working with GWT for the past half year, and am extremely excited about this awesome web-framework !
I recommend anyone who is doing web-development to look into it. As a person that came from the world of Java Swing, the transition was very smooth, and most importantly - fun !

Anyhow, this is not the focus of this particular post. I'm not here to say how great GWT is or
persuade you to use it (although you really should if you want to create amazing rich web apps!!!).

This is about GWT's particular widget - FlowPanel and its advantages over using HorizontalPanel & VerticalPanel.

The "problem" is as follows:
Using HorizontalPanel or VerticalPanel to layout your widgets can be very intuitive and comfortable, especially if you come from the world of Java Swing, where Layout Manager extending components help you to lay out your widgets, without forcing you to think too much how they do it.
GWT widgets are a little different.
GWT is a compiler in it's core, that takes Java code, and compiles it into JavaScript that eventually runs on your browser. Different widgets compile into different HTML elements that are attached into the DOM and need to be rendered, so it is very important to keep your DOM as compact and simple as possible so the browser has to deal with less elements thus rendering your page faster, and is also helpful when you need to look yourself at the DOM to find a specific element or understand the hierarchy.

Using the HorizontalPanel or VerticalPanel, can create some serious performance overhead, and especially when you have lots of those in your application.
The reason is because GWT compiles HorizontalPanel & VerticalPanel into HTML Tables.
When you have a lot of those tables, and with many widgets inside you will end up having
lots of those "<td></td>" , "<tr></tr>" tags which resemble the lines and cells of the tables,
and of course the encapsulating tags of the "<table></table>" & "<tbody></tbody>".

FlowPanel on the other hand is compiled into a "<div></div>" - plain and short.

So as you can see, the problem is that when you have lots of those Vertical/HorizontalPanel - you end up generating a lot more elements in the DOM.

This in turn reflects on the performance of your application. Each time you'd want to manipulate those tables - add a cell, remove one, change content, the look-up into the DOM is longer, and the operations consume more processing.
After the change you will end up making to the DOM, the browser will have to re-render those changes in order to reflect them to the user - the more complicated hierarchy you will have the slower the rendering will be performed.

Ok, now I feel I repeated myself enough, so the point should be clear.

So, after understanding why it's better to use (in many cases, although not necessarily all), here's what needs to be done in order to make the change:


  1. Replace your VerticalPanel (or HorizontalPanel) widget with FlowPanel widget.
  2. In case you're using HorizontalPanel and wish to place widgets next to each other, don't forget to use CSS float attribute.

Example:

import com.google.gwt.user.client.ui.Button;
import com.google.gwt.user.client.ui.Composite;
import com.google.gwt.user.client.ui.FlowPanel;
import com.google.gwt.user.client.ui.Label;
import com.google.gwt.user.client.ui.TextBox;


public class MessagePanel extends Composite {


// Using FlowPanel instead of HorizontalPanel
private final FlowPanel contentPanel;


// Widgets of the message panel.
private Label messageCaption ;
private TextBox messageContent ;
private Button send ;

/**
* C'tor
*/
public MessagePanel() {
this.contentPanel = new FlowPanel();
initWidget(this.contentPanel) ;
// Lets add contents to the panel.
addContents();
// add styles !
addStyles() ;
}


private void addContents() {
// add a name caption
messageCaption = new Label("Message:");
contentPanel.add(messageCaption);
// add an input text field
messageContent = new TextBox();
contentPanel.add(messageContent);
// add a "send" button...
send = new Button("Send message!");
contentPanel.add(send);
}

private void addStyles() {
messageCaption.getElement().getStyle().setProperty("float", "left") ;
messageContent.getElement().getStyle().setProperty("float", "left") ;
send.getElement().getStyle().setProperty("float", "left") ;
}
}


Of course, the code above is only to demonstrate what you can achieve, but not necessarily
how you should really implement it. CSS styles should be put in a CSS file and you should follow GWT's best practices. 

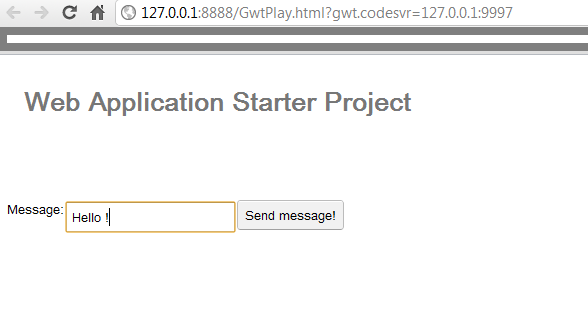
In any case, the outcome of instantiating this widget and adding it results the following:


And results in the following hierarchy in the DOM (from Chrome) :

<div>
<div class="gwt-Label" style="float: left; ">Message:</div>
<input type="text" class="gwt-TextBox" style="float: left; " id="acpro_inp0">
<button type="button" class="gwt-Button" style="float: left; ">Send message!</button>
</div>

So, as you can see this part of the DOM is very concise and straightforward.

Change to FlowPanel to boost your application's performance & to generate simpler DOM.

Happy tuning !

Sunday, April 29, 2012

Spring ROO 1.2 review

This post as the title mentions, is about my personal impressions and thoughts about the 
'Spring ROO' framework, version 1.2.1.

What is ROO?
ROO is a tool, which helps automating the development process of web-applications written in Java.
It supports different kinds of technology stack, such as GWT & Spring MVC in the front end, JPA & Hibernate, EclipseLink in the back-end and such.
The framework is entirely based on the Spring framework, in order to accomplish the goal of creating a full-blown, end-to-end web-application.
The idea is to be able to rapidly create and maintain a web-application with a few 'shell' commands, and then let the users (the developers) fill in the gaps and customize business logic, application state and so on.

ROO monitors the changes the developer makes while writing code, and adapts the application's infrastructure to match and support the developer's actions.

I recommend you visit the ROO website in any case to get the best understanding of the tool.

Before I start telling you what I did and experienced I have to say that I enjoyed working with ROO.
The installation was fast & easy, the ROO shell was easy to use and the documentation was satisfying.

So! after some short-long intro, let me tell you -

What did I do?
1. Created a simple web-application based on a multi-module project - Server & Client modules.
2. Used GWT as the front-end, JPA over Hibernate with a DB in the back-end.
3. Wrote custom code and integrated it in the auto generated files of ROO.
4. Tried to change/add/remove a service (BL) & repository (DAO).
5. Inspected generated code.
6. Tried to remove project's dependency from ROO.

What I experienced
 1. The amount of code generated for the client module (GWT) was quite overwhelming. So many files were created to show/edit/create/delete a single entity named Product in the DB. While some of the generated code is absolutely necessary, a lot of code was created to support every possible option on the front-end.

Unfortunately, this is not configurable, and I could not find a way to tell ROO exactly what I wish to generate ('scaffold'), like - "only desktop support", "only mobile support", "only view/read" capabilities, etc... You can only pick which Entities on your model to scaffold (support on the front-end and back-end). All this leads to a very big codebase, which won't necessarily be used.
This leads to verbosity and a lot of redundancy, which makes your codebase larger and
more complex for no reason.

2. Front end's design - Is following Google's best practices which is really great. You can learn
quite a bit of Google's understanding the design of a web-application on the front end.

3. Generated code looks fairly neat, however all generated code managed by ROO is "hidden" in AspectJ files. - Some people don't like this.

4. No easy removal* of ROO from the project in my opinion... - You could just stop ROO from monitoring your application and continue developing your project. But, all the generated AspectJ files remain. This could be a problem for the future, in case you want to change your classes' implementation. (* - Please see comments at the bottom).

5. Writing tests & integrating them with Services layer was easy.

6. Great end-to-end integration tests, that run on the Browser using Selenium (some kind of a web-driver script player).
It feels to me that even though ROO's GWT add-on tried very hard to give a real added value to developers, it added more complexity than simplicity, and that is in my opinion due to the fact that 
a lot of code is being generated. And that makes it hard in the beginning to dive into the code.

Not to mention how much tweaking needs to be done to disable features for instance.
And in case you're letting ROO manage your project further, you will have to keep track of that
stuff all the time. So if you 'messed' up by scaffolding some entity which you didn't want, you'll spend
your time removing the unwanted code. where is the Undo feature of the shell?
ROO just doesn't feel as fine grained as I would expect it to be.

Conclusion
I think that ROO is walking in the right direction, empowering developers to deal only with the logic of their web applications and not trouble themselves with infrastructure and design problems of standard web-applications.
I am not sure I would use it (especially not the front-end) in production, yet.
Despite all that, it still benefits as a really nice tool for prototyping (or quickly setting up a back-end & DB configuration), and for learning how to implement a web app with best practices.

What can you profit from it:
1. It is an amazing tool to create a web-app POC very fast!
2. It is an awesome tool to learn new technologies and see how they work with each other.
3. Spring ROO applies best practices.
Explanation: ROO has a 'plug-ins' platform, which lets anyone to generate code following a simple command in the shell. 
Google for instance wrote such a plug-in for ROO to integrate with GWT. As a result you get the BEST, latest results for architectural/design/technology/practices on your web-app.
4. It's a great tool to get your backend Spring based infrastructure ready with a DB, in a few minutes, or see how it should be done properly.
5. Runtime performance - Best runtime performance you could have achieved yourself probably.
All generated code/configuration is processed in compile time as regular Java files only!
Following best practices of Spring & other vendors like Google, you can rest assure that there should be no performance issues caused by this tool. (or with very little chance for it to happen - even the best software giants have bugs sometimes).
6. Did I mention the great integration tests running automatically on the browser?
I personally loved this feature!

I think it would be wise to keep an eye on ROO for the future, as it has already been out there for some time, and keeps on improving.

Visit 'Spring ROO': http://www.springsource.org/spring-roo


Tuesday, March 20, 2012

DI with Guice for Java Swing

If you're familiar with Dependency Injection (DI) concepts and frameworks such as Spring,
you know the great benefits it introduces when developing an application.
Spring which I daily use (and praise), is a framework (or an application platform if to be more accurate) that one of its core features and philosophy is DI.

Some of the benefits of DI are well known:

  1. Simplified code.
  2. Reduced dependencies.
  3. Helps 'modularity' and creation of reusable components.
  4. Helps you test your application better.
  5. Lazy loading.


Surely there are other benefits you could think of which were not mentioned above.
So, why not bring all that good stuff to your Rich Client ?

The connection of DI to the title of this post is how to integrate DI in your front-end in case you are building a Rich client application, using Java Swing or GWT for example.

You could follow the MVC pattern (which is well known, and can be great) to build your rich client, and integrate it with a DI framework. However I strongly recommend you consider the MVP pattern for an even better design of your front-end. Which I find it to be much 'cleaner'.
(In MVC some of the business-logic code is scattered between the controller and the View. It's harder
to re-use your View objects/Widgets, especially in case you want to give it to someone else to use, or integrate them in another product).

Smarter people than me talk about it, and you can find great talks on YouTube regarding this subject.

You can later also check Google I/O's excellent talk for "Best Practices for Architecting GWT App"  http://www.youtube.com/watch?v=PDuhR18-EdM

So, if we follow the MVP design pattern and Google's best practices (even if we don't use GWT),
we end up with few key components in our app, i'll try to give some description what they do:

  1. "The" Event Bus - The component where presenters 'listen' to, and can fire events to.
  2. The Presenters - The components which encapsulate the logic of your application.
  3. The Views / Displays - Simply a view - can be a panel with widgets in it. No logic in here!
  4. A Model - Where you keep important data that can be accessed by one or more presenters.


"Show me the code!"

Lets assume you're writing your rich client in Java Swing.
We will use the lightweight DI framework "Guice" by Google:
http://code.google.com/p/google-guice/ to help us achieve our goal.

Lets go over some steps to realize what needs to be done in order to get this to work - don't forget to download Guice and put it's Jars in the classpath.
(Or, scroll all the way down to download the zip file containing the source code).


1) Define a simple View as a dumb object, not knowing anything about logic:
public class ContentPaneDisplay extends JPanel { .... }

2) Define a high level IPresenter interface and the IContentPanePresenter interface:

public interface IPresenter {
/**
* A method of all implementing presenters for presenting themselves on a given container.
* @param c
*/
void go(Container c) ;
}

public interface IContentPanePresenter extends IPresenter {}


3) Define a Presenter that will use view object above as its display:

public class ContentPanePresenter implements IContentPanePresenter {
public static interface IDisplay {
JComponent getAsComponent() ;
}
private final IDisplay display ;
....
}

4) Make ContentPaneDisplay implement the ContentPanePresenter.IDisplay interface.

5) Configure the Display class and the Presenter class to be used by Guice:

public class ApplicationDIModule extends AbstractModule {
@Override
protected void configure() {
// Lets configure some stuff !
bind(IContentPanePresenter.class).to(ContentPanePresenter.class).in(Singleton.class) ;
bind(ContentPanePresenter.IDisplay.class).to(ContentPaneDisplay.class).in(Singleton.class) ;
}
}

6) Add the @Inject annotation to the ContentPanePresenter to be injected the display:

/**
* C'tor
* This is where DI takes place!!!
* Guice will instantiate and provide this presenter with a matching display!
* @param display
*/
@Inject
public ContentPanePresenter(IDisplay display) {
this.display = display ;
...
}


7) Now all that's left is to call the Guice injector to get the ContentPanePresenter:
private static void go(Container container) {
// Guice.createInjector() takes your Modules, and returns a new Injector instance.
   Injector injector = Guice.createInjector(new ApplicationDIModule());
// lets get the 'Main' content pane Presenter !!
   IContentPanePresenter contentPanePresenter =
                                                            injector.getInstance(IContentPanePresenter.class) ;
contentPanePresenter.go(container) ;
}