Pages

Showing posts with label Source Code. Show all posts

Friday, May 19, 2017

React + MobX - 101 Todo App for beginners - Part 1

This walk-through-tutorial (yet another) is to guide you through the usage of the MobX library, while building a React application.

The application we'll build is a simple Todo App.

The post discusses the following topics:

  1. What is MobX - A very short explanation about what MobX is. 
  2. Why do you need it? - Reasons to consider using MobX.
  3. Why not Redux (another state management library)?
  4. Code tutorial - Part 1 (out of 2)

What is MobX - https://mobx.js.org/

In short - MobX is a state management library.

In "long" - MobX is a JS library that allows you to define "observable" state (/model/your JS Objects) containing your App information.

The library gives you the power to derive any computed model that depends on observables automatically!
As MobX puts it:
Anything that can be derived from the application state, should be derived. Automatically
In aspect to React:
This gives you the power to mutate the state directly by reference from your components without calling React's setState, and triggering render only on the components that need to be re-rendered.

Pretty nifty.

For more about MobX: https://mobx.js.org/

Why do you need it?

First of all, no one said you should use it. There are plenty React based applications that work just fine without MobX.

However, you should consider MobX for the following reasons, that may give you some advantage.
For instance:
  1. Simpler Components - Having a shared state in your App between several components can be cumbersome to share, especially if one component is deeply nested in another component that uses same data.
    It would mean, that you'd need to pass to all the children of the top-most component that state, resulting many components that are on the way passing on that same state, but never using it.
    Components that change state to other components, the state of your application distributed among many components, and other complications.
    With MobX, you can specify for each component the exact props it should use.
  2. Organized state model - Your application state with MobX is mostly organized in one or few objects that hold only the state of your application. That makes it easy to reason about the application's model.
  3. Optimized App - render only components that need to render instead of 

That sounds like I'm trying to "sell" you MobX.
I find it to be a good library for state management (not saying it's the only, check Redux too), despite the "magic" which I dislike in principal in software, and the awkward feeling I get when this reminds me of "two-way-data-binding" stuff (which the industry has a love-hate relationship since the ages of JavaFX, Flex, and probably even earlier libraries and frameworks).

It comes with a small cost of adding a library to your App, and learning how to use it.
If you have a small application, with a very simple model, you might not even need it.


Why not Redux?

In case you don't know Redux, as mentioned on their site is:
"A predictable state container for JavaScript apps."

In other words - it's a state managing library, like MobX is. But different.
The "what" is similar, the "how", a bit different.

So first of all - why not use it instead? 
There's really no good answer for that, and IMO it's a matter of personal style and what you're comfortable with. It does seem to have less "magic" though.
(The "magic" i refer to are the observables in MobX - this is where the MobX fun happens).

Some say that MobX is easier to get started with as there's less code to write.
It supports several (optional) “stores” vs one store in Redux which can be annoying if you already have an existing App and you need to start consolidating all your state to a single place. 
It conforms to a non-FP paradigm, where your state can be mutable (the observable objects in your state).

In any case, I would advise to try Redux before you make your decision.


Code walk-through


Lets get our hands dirty.
We're going to build the Todo App using MobX & React at last.

Step 0: Fork or clone the Git Repo
Go here and fork/clone it: https://github.com/nirgit/todoMobxTutorial

You will now have a skeleton application which is ready and set up, using ES6 with JSX & Webpack.
MobX is also included in the package.json, so you won't need to add it as a dependency.

Go to the project's directory and run from the console / shell:

> npm run start

Now go to http://localhost:8080

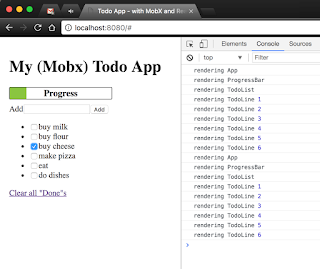
Your web page should look like this:


Step 1: Creating a plain React Todo App

Lets create our plain Todo application based on React only.
  1. Stop Webpack watching your changes 
  2. Go to the project's directory and run from the console / shell:
> git checkout step1
> npm install
> npm run start


Re-open http://localhost:8080, you should now see this:

Great!
You now have a functional React Todo app.
You can open the app.js file and see all the code pretty much.
You won't find anything unusual.
Note how the entire state though is stored on the App component, so once we will refactor the code a little bit, we will have to pass in the todos as a prop to the child components, and probably stuff like a callback to toggle the todos "isDone" field, so we can use setState in order to make it work.

Go back to your shell and now, checkout the step1_2 branch.
> git checkout step1_2


Open the App.js file and take a look at the render method.
See the line?
...
<TodoList todos={this.state.todos} toggleDone={this.toggleDone.bind(this)} />
...

Notice how we pass in to the TodoList component the toggleDone callback, which is still defined on the App component.  If you would decide to create Todo components, you'd probably pass on that callback into each of those components.
And so you will have a component which passes a function to a child (TodoList) which does nothing with that function but pass it on to its children, which affect a state that's found on its grand parent.
A bit Messy.
If you'd have this situation in a large scale application, not only it may be confusing, but it could be practically impossible to reason about the full state of your application at any given point in time.

Lets add MobX and see what happens.

Step 2: Adding MobX to our React App

MobX uses a very small set of core API.

@observable
The API's most significant and basis to all the MobX "magic" is the observable function / decoration (function if you decide not to use the decoration syntax from ES Next).
On this post we'll stick with the decoration as it feels (subjective) a cleaner way to declaratively state the fact a piece of data/object is being observed.

@observer
We have an "observable" data, now what?
We need someone to "observe" it, and react to the changes.
MobX being a library in its own right, does not provide an @observer for React Components "OOTB" ("out of the box").
In order to use such @observer we need to use the MobX-React NPM package.
Then we can "decorate" our React Components with an @observer decoration.

The reaction to the changes made to the observable object will result in calling the render method of the React component observing that object. Pretty cool.

Code example:


So every time you will change the bestMovies collection, the render of MovieList component will be triggered.


Stop your app from running if it is, go back to your shell and now, checkout the step2 branch.
> git checkout step2

and run the following to install missing missing NPM pacakges and re-run the app:
> npm install && npm run start


You shouldn't see any visual difference, but open the browser's Console and see what you got:


See how now you get a log print in the console when a component renders.
Try clicking a checkbox, you should get the following prints:

See how now you get only part of the prints?
Lets do a quick analysis:
  1. App Component - renders because its render function is using the isDone flags of the Todos in order to render the Progress Bar.
  2. ProgressBar Component - renders for obvious reasons.
  3. TodoList Component - renders because it passes all of the properties of the Todo objects, including the isDone property when rendering.
    It does that by using the ES6 spread operator (see in the code "{...t}")
  4. The TodoLine Component - A new component created representing the Todo lines, as it makes it clearer to see MobX's benefit.
    Notice how only the TodoLine Component whose line we changed rendered.
    All the rest - stayed the same without getting re-rendered.


You can run the quick following check.
Go to the todoLine.js file and change the following line:
export default observer(TodoLine);

to this line:
export default TodoLine;

See how we omitted the MobX observer?
Now go back to the browser, and try to check the same checkbox as earlier.
Keep your console opened. You should get the following prints:


Hopefully you got something out of this post, as it should give you an idea of what MobX is by now. Stay tuned for Part 2 blog post that will discuss topics like:

  1. Adding Actions and Action Handler
  2. Adding a Provider component
  3. Adding Containers
Or go explore more yourself on https://mobx.js.org/.

Enjoy,


MobX library image
 ReactJS library image


Monday, November 14, 2016

Bit.ly Resolver - Chrome extension

It's been a while since I last blogged about anything...

Something that's been bothering me for a long time since I've been on Twitter, are bit.ly links.

Naturally Bit.ly links got a serious boost in usage with Twitter's launch, and they serve a great tool of compacting links and embedding them beautifully inside Tweets.

However, many times, looking at those links, you can't help but wonder - "where will it take me if I click it? Am I going to get a worm or a virus on my laptop?"
Sometimes, people are just lazy to put any context telling you what this link is about, and so, they tweet or post a bit.ly link with their cat's photo.
(Usually it is not their cat's paw-n-shop ya' know...).

So being very lazy that I am, yet curious as a cat.. I decided to pick up the glove, and create my very own Chrome extension (sorry y'all other folks using other browsers), that shows you the REAL URL behind that bit.ly link you're gazing it right at this second, simply by hovering on it.

Welcome - Bit.ly Resolver Chrome Extension

You can simply click it, in order to install that extension on your browser.


Bit.ly Resolver - Chrome Extension


GitHub link for those of you who are interested: 

As a bit.ly :) : http://bit.ly/2fzMal8
Or simply as: https://nirgit.github.io/bitlyResolverCE/


See you in a bit.ly!

Monday, May 9, 2016

Hubot Script for Image Search on Bing

How to write a Hubot script that integrates with Bing in Javascript

In case you haven't heard of Slack, I recommend you check it out.
Slack is a Messaging App with an extremely cool edge of customization abilities.

One of those abilities allows you to install an App that plugs-in to Slack, called Hubot.
A Hubot is a Bot app, that can listen to your commands on Slack, and perform a task.

After installing your Hubot on your machine, you will notice it has a "scripts" directory.
You can use this directory to write your own custom scripts which the Hubot will execute!
Very cool!

The scripts can be written in CoffeeScript and in Javascript.
You can simply copy-paste the code below, but notice that it will not work, unless you get your own Bing API key.
You can easily get it for free here.
This is how the screen looks like at Bing after you will (create an account as needed and) login.

Be sure to copy the API Key that (highlighted in red) shows in the box, 


and replace it with the 'key', 
which equals to 'XXXX-....-XXXX' in the code below.


The expected result


Enjoy hacking & slacking!
Nir


The code

// bing.js


'use strict'

var querystring = require('querystring');
var http = require('https');

// replace the 'XXXXX...' string here with your own Bing API KEY
var key = 'XXXXX-XXXXX-XXXXX-XXXXX'; 
var HOST_NAME = 'bingapis.azure-api.net';
var DEFAULT_NUMBER_OF_IMGS = 20;
var SAFE = {
  low: 'Off',
  medium: 'Moderate',
  high: 'Strict'
};

var HTTP_REQUEST_HEADERS = {
  "Accept": "*/*",
  "Content-Type": "application/json",
  "Ocp-Apim-Subscription-Key": key
};

function getParams(query, count, offset, safe) {
  count = count || DEFAULT_NUMBER_OF_IMGS;
  count = Math.max(5, Math.min(50, count));
  offset = offset || Math.floor(Math.random() * 4);
  return {
    'hostname': HOST_NAME,
    'method': 'GET',
    'path': buildQueryParameters(query, count, offset, safe || SAFE.medium),
    'headers': HTTP_REQUEST_HEADERS
  };
}

function buildQueryParameters(query, count, offset, safey) {
  return '/api/v5/images/search?q=' + query + 
'&count=' + count + '&offset=' + offset + 
'&mkt=en-us&safeSearch=' + safey;
}

function getImagesFromBing(query, hubotCallback) {
  var body = [];
  var params = getParams(query);
  var req = http.request(params, function(res) {
    res.setEncoding('utf8');
    res.on('data', function (chunk) {
      body.push(chunk);
    });
    res.on('end', function () {
       var data = body.join('');
       var dataAsJson = JSON.parse(data);
       var values = dataAsJson.value;
       var imgs = values.map(function(val) {
         return val.contentUrl;
       });
       hubotCallback(imgs);
    });
  });
  req.end();
}

module.exports = function(robot) {
    robot.hear(/bingme (.*)/i, function(res) {
        var photoname = res.match[1];
        res.reply("Looking for a photo of \"" + photoname + "\" on Bing!");

        var escapedQuery = querystring.escape(photoname);
        getImagesFromBing(escapedQuery, function(imgs) {
          var randomPhotoIndex = Math.floor(Math.random() * imgs.length);
          res.send(imgs[randomPhotoIndex]);
        });
    });
}


Friday, March 8, 2013

GWT Chrome extension with JSONP Server communication

I thought this post would be a good idea for people who want to know how to make an 'end-to-end'
GWT Chrome extensions, with a connection to a server of their own.

While this demonstrates specifically how to enable to communication from a Chrome extension, there is
no difference in code if you wish to deploy your client code else where (not on Chrome).
Many web applications choose to deploy their Server code & Client code on the same application server, like JBoss or Tomcat.

As you know in GWT there are several ways to communicate with a server.
One of them is RPC for instance, which gives you the ability to invoke methods on a Java interface,
not having to deal with anything but Java code. Which is cool, as it makes a very smooth transition from
the client side code to the server side code.

However, when we want to implement this in a Chrome extension things get a bit trickier.
The reason is that you'd have to separate your server module from your Chrome extension module
(as we can't deploy Server side classes to Chrome - it runs only JavaScript),
and would need a shared model between the two in order to communicate.
It's not hard to do at all, it's only a longer example to make.
(In Eclipse, if you create a new "Web Application Project" using Google's plugin, you will have the client & server code in the same project, with a "shared" directory which serves a model bridge between the two).

Another option that exists, is using JSONP communication to the server.
In our case - this makes it a lot simpler.
We will expose some REST API on a Server we'll implement, for getting images, and send a JSONP request from the QuickPik extension to retrieve those images. Obviously, it can be anything else you want it to be in your application.

TO THE CODE!!!

The Server

In order to create a REST service and expose it, we will use the Jersey library which is an implementation for
building RESTful web services. It's very simple.

The following QuickpikService class, is our REST service:


package quickpik.server.web;

import java.io.IOException;
import java.io.InputStream;
import java.net.MalformedURLException;
import java.net.URL;
import java.util.Date;

import javax.ws.rs.GET;
import javax.ws.rs.Path;
import javax.ws.rs.Produces;
import javax.ws.rs.QueryParam;
import javax.ws.rs.core.MediaType;

import org.codehaus.jettison.json.JSONException;
import org.codehaus.jettison.json.JSONObject;

import com.sun.jersey.api.json.JSONWithPadding;

@Path("/quickpik")
public class QuickPikService {

private final static int BUFFER_SIZE_IN_BYTES = 1024;
private final static String FLICKR_API = "http://api.flickr.com/services/feeds/photos_public.gne?format=json&tagmode=all&tags=" ;

@GET
@Path("searchPhotos")
@Produces({ "application/x-javascript", MediaType.APPLICATION_JSON})
public JSONWithPadding getPhotos(@QueryParam("searchExp") String searchExp,
@QueryParam("callback") String callback) {
// "log" the call
System.out.println("[" + new Date() + "] searching for: " + searchExp) ;
URL flickrUrl = getSearchURL(searchExp) ;
JSONObject data = tryToGetSearchResult(flickrUrl);
return new JSONWithPadding(data, callback);
}

private URL getSearchURL(String searchExp) {
String composedURL = FLICKR_API + searchExp;
try {
return new URL(composedURL);
} catch (MalformedURLException e) {
e.printStackTrace();
throw new RuntimeException("URL composition failed. Please check your URL: " + composedURL, e) ;
}
}

private JSONObject tryToGetSearchResult(URL flickrUrl) {
try {
return getSearchResult(flickrUrl) ;
} catch (IOException | JSONException e) {
e.printStackTrace();
throw new RuntimeException("Failed searching.", e) ;
}
}

private JSONObject getSearchResult(URL flickrUrl) throws IOException, JSONException {
InputStream is = flickrUrl.openStream() ;
String result = readDataFromStream(is);
// Flickr specific string prefix for the JSON feed.
if(result.indexOf("jsonFlickrFeed(") >= 0) {
result = result.substring("jsonFlickrFeed(".length(), result.length()-1) ;
return new JSONObject(result) ;
} else {
return new JSONObject("{}") ;
}
}

private String readDataFromStream(InputStream is) throws IOException {
StringBuilder data = new StringBuilder() ;
byte[] buffer = new byte[BUFFER_SIZE_IN_BYTES] ;
int bytesRead = is.read(buffer) ;
while(bytesRead != -1) {
data.append(new String(buffer, 0, bytesRead)) ;
bytesRead = is.read(buffer) ;
}
is.close() ;
return data.toString() ;
}
}


That's it. This our REST service, and we are exposing our API by using the @Path annotations
on the class and on the public method getPhotos. There are also other annotations such as the
@GET annotation and the @Produces annotation which state that the method is invoked on
an HTTP GET, and returns (@Produces annotation) a JSON (with Padding eventually = JSONP) object.

As you can see, in the class, we are using a Flickr API to get our images data from.

Now all that's left in order to make this service work, is to define the Jersey servlet in the web.xml file,
which is done this way:


<web-app>
...

        <servlet>
    <servlet-name>Jersey REST Service</servlet-name>
    <servlet-class>com.sun.jersey.spi.container.servlet.ServletContainer</servlet-class>
    <init-param>
      <param-name>com.sun.jersey.config.property.packages</param-name>
      <param-value>quickpik.server.web</param-value>
    </init-param>
</servlet>

<servlet-mapping>
    <servlet-name>Jersey REST Service</servlet-name>
    <url-pattern>/rest/*</url-pattern>
</servlet-mapping>

...
</web-app>


After doing that, we're able to refer to our REST service by using a URL in the browser:
http://localhost:8080/<web-app-name>/rest/quickpik/searchPhotos?searchExp=<our-search-term>

In order to verify this worked indeed and to get a better understanding of how the strucutre of our JSON result looks like, before even writing code to the GWT Chrome extension client,
i did a small test using jQuery, to see whether this worked. - You can find it in the GitHub repository.
What I did in a nutshell, was to call the REST API:
$.getJSON('http://localhost:8080/qpserver/rest/quickpik/searchPhotos?searchExp=hello&callback=?', jsonCB);

So I executed an AJAX call to search for "hello", and passed a callback - jsonCB to process the result.
jsonCB looks like this:


function jsonCB(result) {
console.log(result);
if (result !== null && result) {
if (result.items.length === 0) {
$($("#serverResponses")[0]).append("No results.")
} else {
for (item in result.items) {
var url = result.items[item].media.m;
var imgItem = document.createElement('img');
imgItem.src = url;
$($("#serverResponses")[0]).append("Server response: ")
.append(url).append("<br>");
$($("#serverResponses")[0]).append(imgItem).append("<br>");
}
}
}
}


Note the highlighted text! - This is how we get the URL information of the photo items being sent back to us from the server.
So now we know that inside "result" which is a JSON object, resides an array of objects, that contain each
an object called media with a field called m.
You can discover this by simply debugging the returned values from the Server in the browser.

So now, we can finally add some code to our GWT Client.


Client side - GWT Chrome extension

In the previous posts of QuickPik, you might have noticed, that in order to add an additional ImageDataSource, all you need is to implement an Interface IImagesDataSource and add that ImageDataSource to the DataSource enum.
It's much easier than it sounds.
So we need to do the following:
1. Write an ImageDataSource that "talks" to our Server.
2. Edit the manifest.json file to allow communication to our server in order to comply with the
    "Content Security Policy" of Chrome's extensions.


IImageDataSource implementation - ServerDS


public class ServerDS implements IImagesDataSource {

private final static String QUICKPIK_SERVER_URL = 
"http://localhost:8080/qpserver/rest/quickpik/searchPhotos?searchExp=" ;

          ...

@Override
public void getImages(final String searchExpression, final FilterLevel filter, 
                                                 final Callback<PhotosSearchResult, Void> callback) {
String url = QUICKPIK_SERVER_URL + searchExpression ;
JsonpRequestBuilder jsonp = new JsonpRequestBuilder();
jsonp.requestObject(url, new AsyncCallback<ServerResult>() {
public void onFailure(Throwable throwable) {
// do some error handling..
}

public void onSuccess(ServerResult result) {
handleLoadedImagesResult(searchExpression, filter, result, callback) ;
}
});
}

private void handleLoadedImagesResult(String searchExpression, FilterLevel filter, ServerResult result, 
Callback<PhotosSearchResult, Void> callback) {
JsArray<ServerImageItem> imageItems = result.getItems();
LinkedList<Photo> photos = collectImages(imageItems);
callback.onSuccess(new PhotosSearchResult(searchExpression, filter, photos, 0, false)) ;
}

private LinkedList<Photo> collectImages(JsArray<ServerImageItem> imageItems) {
LinkedList<Photo> photos = new LinkedList<Photo>();
for (int i = 0; i < imageItems.length(); i++) {
ServerImageItem imageItem = imageItems.get(i);
Photo p = new Photo(i+"", imageItem.getImageURL(), imageItem.getImageURL()) ;
photos.add(p) ;
}
return photos;
}
}


I'll try to explain the code very shortly:
1. At the top of the class you can locate the URL to the server we will be using to get the images from.
2. getImages method which must be implemented is passed a searchExpression a filter and
   a callback. We will ignore the filter to make things simpler.
   GWT offers a class called JsonpRequestBuilder which allows us to invoke an asynchrounous
   call to the server, and passing a callback to deal with the result of the invocation.
3. If the call was successful, we have to handle the result somehow. We do that by calling a handle method.
4. In the handleLoadedImagesResult method, we got an object called ServerResult. 
    ServerResult is a custom object created especially for this operation. It is a wrapper to
    a JavaScriptObject, that gives access to the result.items object array. (Remember from the jQuery test?)

This is how ServerResult looks like:


public class ServerResult extends JavaScriptObject {

   protected ServerResult() {
   }

   public final native JsArray<ServerImageItem> getItems() /*-{
     return this.items ;
   }-*/;
}


The native getItems method, is a convention of GWT to write JavaScript code to the underlying JavaScriptObject that the Java object wraps. So when you invoke getItems, behind the scenes the
JavaScript code "return this.items" is executed, returning the JavaScript items Array.

I also mapped the objects in this array to a Java object in the same way I did with ServerResult.
Following the same idea, ServerImageItem looks like this:


public class ServerImageItem extends JavaScriptObject {

protected ServerImageItem() {
}

public final native String getImageURL() /*-{
    return this.media.m ;
  }-*/;
}


Here we use getImageURL method to return the (JavaScript) object's media.m property.
(This is exactly the same structure that was referred to when testing with jQuery above).


So after this long explanation, all we do in the "handle" method, is basically gathering all of our
images URLs, creating a Photo list, like expected in the callback passed to us in the getImages method
invocation and invoking the callback, passing it an expected PhotoSearchResult object containing
our Photos.

5. Now we must add our ServerDS to the DataSource enum, so it will be included as a data source
    when we run a search.
    We do that simply by adding the (bolded) line below:

public enum DataSource {

// add here your data sources
FLICKR(false, new FlickrDS()),
QUICKPIK_SERVER(true, new ServerDS())
;
         ....
}

Notice how I intentionally turned off FLICKR Data Source, setting its isEnabled flag to false.

6. Last thing that needs to be done, is to enable our Chrome extension to make calls to our server by
    editing the manifest.json file, adding the following line to it:

{
   ....
   // A relaxed policy definition which allows script resources to be loaded from localhost:8080 over HTTP
  "content_security_policy": "script-src 'self' http://localhost:8080; object-src 'self'"
}


That's all folks, all you need to do now, is build the Server (I did it with Gradle in this project), compile
your GWT client, deploy it on Chrome and watch it work.

You can access all the code on GitHub, and download it.

Code on GitHub
All of the project's code can be found on GitHub at: https://github.com/nirgit/Quickpik-with-server


Wednesday, January 30, 2013

RPM example - Application packaging

This post is about something quite different than the others.
It concerns packaging your software as an RPM file making it ready for delivery.
If you have never used RPM before and/or you're not an experienced Linux user, this post is intended for you.

I'm far from being an expert in this area, and I would guess there is probably a better way of achieving the goal I want to show here. Please share your thoughts and experience if you have any.

I assume you already heard of RPM, and understand it's benefits and so on.
This post is not to convince you to use RPM, only how to create such RPM file which you could use.

What's in this example?
I created a "Hello World" Java application, and using Ant, I compile it, and Jar it.
This application could be anything you want - this is just a "place-holder" for you, to replace with
your real stuff.

So, after having an RPM file, we'll be able to install it to the system and remove it afterwards.
The path which the program will be installed into will contain the "Hello World" application Jar.

RPM Structure quick overview

As you probably know by now, RPM files are created using a ".spec" file.
This file tells the rpmbuild tool which we will use how to create the RPM package.
The .spec file contains several sections:

  1. Headers - Headers of the spec file contain stuff like a Summary of what the package is,
    Name of the package, Version & Release information, License & Package and an
    attribute named BuildRoot. BuildRoot is important - it specifies the location
    of where your package will be temporarily installed.
    What I mean by temporarily, we'll get to later.
  2. %description step - This is where you can type just about anything you want describing
    your awesome application.
  3. %prep step - In the step, preparing your Source files to be built (using Ant in our example).
    "What's to prepare?" - you ask? - Well, in order to build an RPM package, you must provide
    RPM a .tar file or a zipped file of some kind to it's SOURCES directory, (I'll explain the
    structure of RPM further down), so what you need to do in this step is to extract your
    archived sources.
  4. %build step - This is where the actual build of your application happens. In our case, we'll
    execute ant on our build.xml file, that compiles and Jars the application - real simple.
  5. %install step - This is the step that happens after the %build step, and will determine how
    your installed package will look like. We will copy the necessary binaries (Jar in our case) to a relevant directory.
  6. %files section - This section determines which files from the %install step to pack, and with what access rights.
  7. %clean section - This section runs after packaging was done, and cleans up all the leftovers from your build and your install steps. It's important to delete all the old files, especially if you build several RPM packages, you don't want to have files of another RPM build process in your way.

Okay. I know this still doesn't tell you how to do stuff, but this introduction is quite important in my opinion.
So take a deep breathe one last time, and we'll go over the rpmbuild directory structure and understand the steps we need to take in order to accomplish our mission.

"rpmbuild" Directory structure

An important part of the way RPM works, is its directory structure where work is being done.
You should be able to locate your rpmbuild directory on your machine, which usually should
show under your home directory.

The rpmbuild directory contains the following sub-directories:
  1. BUILD - This is the directory where your sources will be built, and where the artifacts of your build will be located. The %build step, reads from the directory and writes to it. 
  2. BUILDROOT - This is the directory where you will "temporarily" install your binaries to.
    You can think of it as the "INSTALL" directory. After the build step, the BUILDROOT
    serves as a directory to contain the files in a given directory structure. Those files in this
    specified directory structure will be installed afterwards using RPM.
    To clarify: If you place under BUILDROOT a directory called my-app-123 then on the
    real install of the RPM package, your package will be installed under /my-app-123.
    This step reads from the BUILD directory and writes to the BUILDROOT directory.
  3. RPMS - This is the directory that will contain your RPM package in the end.
  4. SOURCES - This is the directory where you should place your archived sources.
  5. SPECS - This is the directory where you should place your .spec file which will create
    the RPM package.
  6. SRPMS - This is a directory where source RPMs are created and stored. 

Each of those directories, can be referenced in the .spec file using RPM variables.
Variables
%_specdir~/rpmbuild/SPECS
%_sourcedir~/rpmbuild/SOURCES
%_builddir~/rpmbuild/BUILD
%_buildrootdir~/rpmbuild/BUILDROOT
%_rpmdir~/rpmbuild/RPMS
%_srcrpmdir~/rpmbuild/SRPMS

Now that we finished our overview. Let's go over our 8 steps to create a packaged application with RPM.
  1. Create an application (write source code) - in our case, a simple "Hello World" application.
  2. Create the build file for the application - Ant's build.xml file in our case.
  3. Create an archive from our application's sources.
  4. Place the archive (tar) at ~/rpmbuild/SOURCES directory.
  5. Copy the .spec file into the ~/rpmbuild/SPECS directory.
  6. Create the RPM package using: rpmbuild -ba <spec_file>
  7. Install the package.
  8. Uninstall the package.
Now, lets go a bit into details:
  1. You can download the pre-made application entirely from GitHub: rpm-example-project.zip
    in order to skip steps 1,2 and 3.
    (You can also access the repository - http://github.com/nirgit/RPM-Project-Example).
  2. After downloading the zipped application, and extracting it somewhere on your machine,
    you can take a closer look into its hierarchy. You will find under the Application directory,
    a directory called src which contains the sources of our application, and you will find
    the build.xml file which builds the application.
    You will also find 2 other files - the application.tar containing the application sources,
    and the project.spec file.
  3. You need now to copy the .spec file into the ~/rpmbuild/SPECS directory, and the
    application.tar file into the ~/rpmbuild/SOURCES directory.
  4. In order to create the package now, you're required to run the rpmbuild tool, by
    executing: > rpmbuild -ba ~/rpmbuild/SPECS/project.spec
  5. Since I use Ubuntu, I also use alien to install the package. In case you're running on
    a Linux flavor such as CentOS, I think you can simply run the regular RPM install.
    With alien: > sudo alien -i ~/rpmbuild/RPMS/i386/Example-RPM-Project-1.0-1.i386.rpm
    Without: > rpm -i ~/rpmbuild/RPMS/i386/Example-RPM-Project-1.0-1.i386.rpm
  6. After the install you should be able to find the package installed under the root:
    /Example-RPM-Project-1.0-1
    Under it, you can find the app.jar.
  7. You can uninstall the package using RPM's command: rpm -e <package_name> 
    or (in my case using Ubuntu): sudo dpkg --remove example-rpm-project

The SPEC file
This is the SPEC file associated with the RPM package.
I hope it will serve you as a good starting point for your own SPEC file.


################################################################
#
# This is an example of a simple RPM spec file.
#
################################################################

Summary: An RPM Spec example
Name: Example-RPM-Project
Version: 1.0
Release: 1
License: Apache 2.0
Group: Applications/Sample
URL: http://www.mycompany.com
Packager: Nir Moav <getnirm@gmail.com>
BuildRoot: %{_buildrootdir}/%{name}-%{version}-%{release}

%description
This is a sample SPEC file for the RPM project
demonstrating how to build, package, install(deploy)


%prep
# extract the tar file containing all the sources, to the build directory.
tar -xvf %{_sourcedir}/*.tar -C %{_builddir}


%build
echo "Building the project..."
cd Application
# running ant to build the java project (could be make/maven/gradle or anything else).
ant


%install
# This is the hierarchy which is going to be inside the package (RPM/Deb) eventually.
echo "Install phase..."
mkdir -p %{buildroot}/%{name}-%{version}-%{release}
cp -R %{_builddir}/Application/output/jars/* %{buildroot}/%{name}-%{version}-%{release}


%post
#This runs post the install - maybe you want to execute the application already then
echo "Post install.."


%postun
#this runs after the uninstall
echo "Post Uninstall..."


%files
# tells which files to contain in the package and with what access rights
# the triplet contains of (<file mode>, <user>, <group>). Make the necessary changes.
%defattr(-,nir,nir)
/*


%clean
# Clean up! Must run this! after build and install steps execute, this will make
# sure that the directories are remained clean, so in case you're building another
# package, you don't want to pack the previous build's artifacts.
rm -rf %{_builddir}/*
rm -rf %{_buildrootdir}/*


That's all folks!
I hope you managed to read through this long post, and found it useful.

Enjoy,
Nir

Wednesday, December 5, 2012

SpacePong - version 2 - HTML5 Game with GWT

Hey,
This is just a small update of the game, to make it a bit more fun to play actually.
So now you can pick different levels to play and have something a bit more challenging.

The source code has changed of course, and you can find it like before on GitHub:
https://github.com/nirgit/GwtPong/tree/space_pong_ver_2_0_0


Enjoy!

Wednesday, November 28, 2012

GWT HTML5 Game Example - Pong

Hi everyone,

This post is intended to present a very simple example of a game, made with the HTML5 support of GWT.
The game uses only GWT, without any other 3rd party libraries such as PlayN which works with GWT and is rather famous and meant for creating games based on HTML5.
Take a look at PlayN's website: http://code.google.com/p/playn/

GWT provides an API to the underlying HTML5 Canvas, and lets you use it to create
custom graphics.

This example shows the game of Pong. Though the game might be a little buggy, it nevertheless makes use of the fundamental HTML5 Canvas features, such as drawing simple geometric shapes, such as rectangles, circles, gradients and with those elements creating a very simple and compact code for a game.

You can find all the code on GitHub for you to clone: https://github.com/nirgit/GwtPong

Click the screenshot to play:


Have fun playing!

Sunday, August 26, 2012

GWT Chrome extension using version 2 manifest

Hi everyone,

A while ago I wrote a small post about how to create Chrome extension using GWT, claiming
you could use GWT to make powerful Chrome extension.
One of the comments was regarding the usage of the manifest version.
When you write a Chrome extension, you must provide with a file called manifest.json which
serves as some kind of descriptor file to your extension.
It contains all sorts of things, such as the name of the extension, description, icon, action,
javascript files involved, and so on...

One of the entries in that file is the version entry.
As for today Chrome supports the current version - 2, and also supports (for the moment)
version 1.
However, this is changing, and Google already announced that they will stop supporting version 1
in the future (see http://developer.chrome.com/extensions/manifest.html#manifest_version), due
to security reasons.

So I was asked whether it was possible or how is it possible to deploy the GWT extension with the
version 2 attribute in the manifest.json file.

Version 2, is stricter in terms of security than version 1. Especially when it comes to using external JavaScript files.
You can read about security concerns over here:
http://developer.chrome.com/extensions/content_scripts.html#security-considerations
http://developer.chrome.com/extensions/xhr.html

One of the problems I faced, was the inline scripting I had (JavaScript showing inside the HTML).
That problem came not only on my "Hosting" HTML file, but also on the compiled outputs of GWT,
where HTML file which was needed was created and contained JavaScript code.
When that happened, I couldn't execute the extension on Chrome using version 2 in the manifest.json file.

I wrote in response to a comment someone left regarding this problem, that in case Google would have a way to separate JavaScript files from HTML, then problems would be solved.
Back then, I didn't see such options for the GWT compiler.

However, after doing some more searching, I found out that it does exist (!).
And so by adding a simple line in the .gwt.xml file of the application, you can compile all
your GWT application output into a single JavaScript file. Meaning - no HTML files containing
inline JavaScripts.

The line one needs to add is:
...
<add-linker name="sso" />
...

I added it to my Quickpik.gwt.xml file, and so when you run the GWT compiler, you get at the end
one JavaScript file containing the entire code of your app. Awesome!

You can access the entire code on Github and download it from there:
https://github.com/nirgit/Quickpik

You can simply click on the "Downloads" on the right hand of the screen, in order to download
the repository as a ZIP file.

In case you're a GIT user, my suggestion is that you just clone the repository. It's really small.
Simply open your GIT shell and type:
git clone https://github.com/nirgit/Quickpik.git

The extension is already ready to be used in Chrome, and you can deploy it by opening Chrome's
Tools -> Extensions tab, and checking the "Developer mode" box.
Afterwards, you will be able to deploy the extension by selecting the "Load unpacked extension..."
option and selecting the war directory of Quickpik.

I am hoping this is somewhat useful.
I think GWT is an absolutely great tool, and one that can be a lot of fun writing Chrome Extensions.

Until next time!


Wednesday, July 11, 2012

Source on a Github repository

Hey everyone,

This is a really short note.
From now on, in case I will publish more code in the future I will try to make sure it is uploaded 
to Github, so anyone could profit from it.

The Github repository URL: https://github.com/nirgit

Enjoy.

Monday, July 9, 2012

Quickpik - GWT Chrome extension - Search photos


As a continuation to my previous post, this isn't about discussing anything.
It is about doing - giving an example of something quite simple & cool which you could do yourself using GWT, to build a chrome extension.

Being a bit of a GWT enthusiast, I built an extension for Google Chrome called QuickPik - which allows users to search for images from right from the toolbar.

Quickpik is using Google Images & Flickr (Yahoo) APIs.
You can run a simple search, and get some images as results. It's really simple.

You can just download the zip file from the link below, extract it and install the .crx file right into Google Chrome by dragging the file into it. If you're scared of some evil code running on your browser - just open the source code in the zip file, build the extension yourself, and then install it.

Keep in mind that the idea of this post is to show how easy it is to create a
cool extension for Chrome.
The code might not be extremely well documented, nor does it strictly follow Google's best practices like the MVP pattern or bundling CSS or Image resources and so on, but...

You can expect something compact and simple enough once you open it and take a look.
I don't think there should be a problem understanding much of the code.

Would love to get feedback if this helped anyone.

Both source code & Chrome extension below are available to download in one zip file.

Have fun !!!

The project on Github:  https://github.com/nirgit/Quickpik
A Zip file to download:   http://www18.zippyshare.com/v/16094412/file.html